I've always loved hats, especially those that show a lot of patina from years of loving, faithful use. AND, because I don't have enough hobbies already (INSERT SARCASTIC EYE ROLL HERE...) , I thought I'd try my hand at making some custom hats for myself and those closest to me.
I took a lot of inspiration from examples I've seen online, but
a special "hat tip" (pun intended) to Hat Maker
Nick Foquet, Hats by Grizz, Tatton Baird, Hornskov Hats and many more.
HERE ARE MY HATS


My Aussie hat to fedora conversion
(before and after)

A hat for my daughter


A hat for Susan (before and after)


My western palm leaf hat to fedora conversion
(before and after)


My western campaign hat
(before and after)


A hat for my son's wife (before and after)


My western to patinaed fedora conversion
(before and after)


Another western to fedora conversion
(before and after)


My old western hat converted to an
"Open Road-Styled" hat
(before and after)
Below are photos of the processes used to make each hat
My Aussie Hat Conversion
I ordered this hat off of Etsy. It was an Aussie styled hat that was made in Australia
and sold through the Outback Hat Co. This hat had seen better days, but it was still
in good shape and would be a good "starter" hat to practice on.

I stripped out the leather sweatband, pulled out the very dirty silk hat liner
and removed the hat band. Now, it was in the raw state and ready to be
transformed into what I wanted.

Above left, is a hat block I had to order from Poland, which is 59 cm diameter. Because I
needed 59.5 cm, I wrapped the base with blue painter's tape to add the add'l 1/2 cm.

I steamed the felt blank on both sides until it was pliable.

I then stretched the steamed hat over my hat block and used some thin poly/cotton
rope with a hatter's knot tied into it to create the hat break (the line that
separates the crown from the brim). I then left it in the block to dry for a few days.

After the hat was completely dried and formed to the hat block, it was time
to sew in the sweatband. I wrapped the sweatband around my head shape form
to get the right dimension.

I then pinned the sweatband in place and sewed it in by hand.

Now I re-inserted my head form into the hat for shaping to my head shape.

Then I steamed the hat again and that took the hat from the basic oval shape
to the exact shape of my head. The hatter's rope was used to pull the crown
onto the form to set the shape.

Now, it was time to sew on the hatband. Hats use a special ribbon called grosgrain and
it takes the shape and contours of a hat very nicely.

The hatband and ribbon are all in place.

After ironing the brim to get it flat, it was back to the steamer so that I could set
the desired crease into it.

Now for the fun, unpredictable part. I sprayed the hat liberally with denatured alcohol
and set it on fire! In the image, you can barely see the flames, but it did it's job and gave
the hat a nice, used patina.

Here, the hat is still a little damp with water that I sprayed on to douse the flames, but you can see the light burn markings and the "age" it put on the hatband.
I'll just fit it with a new silk liner and put a small turquoise pin on the crown (my trademark)
and it'll be completely done.

And, voila, a finished hat. It fits me perfectly due to the conformer's
measurements and this is already my favorite hat.
Now, I'll go into the world and put some additional, real patina on it.
My daughter has already "placed an order" with me for a hat for her
and I can't wait to make her a one of a kind creation.
A HAT FOR MY DAUGHTER
A HAT FOR MY DAUGHTER
I forgot to take pictures of the process for hat I made my daughter, but
I really like the way it turned out and I think it looks terrific on her.

MY FIRST STRAW HAT CONVERSION
I found this hat at a local thrift store for $5.99, so I thought this would be a good,
cheap hat to practice on. Originally, it was a large brimmed Mexican palm leaf
cowboy hat. I regret not taking a picture of it when I first bought it, but here is a rough idea
of what it looked like new.

I started by cutting a large portion of the brim and sewing a line around it to keep
if from unraveling too much.
Then I steamed it and stretched it over my hat block and then re-steamed it
with my head block inside.
I made a simple ribbon & bow out of some military webbing
and then I sprayed it with alcohol and set it on fire.
It came our pretty well for my first attempt and I learned a lot while making this one.
FELT HAT FOR SUSAN
I promised Susan a handmade hat and although I had only made a couple of hats, I wanted to make her something for Christmas 2020.
I bought a rabbit fur hat body, took the measurements and contour pattern
of her head and went to work...

Luckily, I already had a hat block that was Susan's size.
First step is to steam it very well so that it's flexible enough
to stretch over the block.

After it's blocked, form the crown/brim break.

Trim the brim to size and sand the felt.

Spray the hat with alcohol and set it on fire to remove all of
the little fuzzy felt that didn't sand off.
I forgot to photograph the sewing in of the sweatband and sewing on of the hat band,
as well as the creasing, but you get the idea. All of my hats are adorned with the
small silver and turquoise hat pin on the upper part of the crown.
CAMPAIGN HAT
Western-Styled
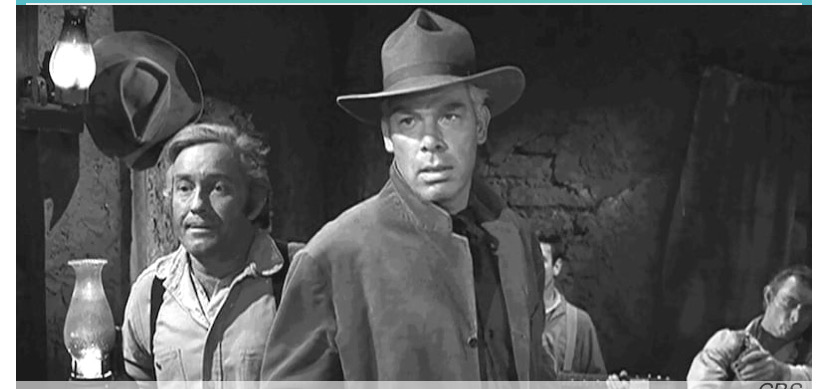
I've always loved Lee Marvin in virtually everything he's been in and the man
knows how to wear a hat.
This picture is from his appearance in a Twilight Zone and it inspired me
to try and make a similar hat.

This is an old campaign hat taken to Tatton & Baird hatters in Utah
for repair work. Tatton & Baird makes absolutely beautiful hats
and I find them to be very inspirational.

I bought this Australian Akubra hat at a thrift shop for $30.00.
I was very nice when I purchased it, but it was not a style that I liked,
so I tore it apart and started from scratch.
Blocking and forming the crown/brim break.
A HAT FOR MY SON'S FIANCE',
AMY, FOR HER WEDDING DAY GIFT
I wanted to make something special for my son's fiance' and
hopefully have it ready to give to her on her wedding day.
While she and my son were visiting home for Christmas, I
took Amy's measurements and head contour and ordered
the hat body and made the head plate.
I was able to find a really nice hat body in the color she wanted and was lucky
to have received it from Australia amidst the Covid epidemic.

Got the hat steamed, blocked and the hat brim/crown break set.

Trimmed the brim to size.

I chose a purple and silver satin lining for Amy's hat.

MY "WORN OUT" SILVERBELLY FEDORA
I found a beautiful silver belly hat at a thrift store and picked it up for $34.00. It's
a 6 XXXXXX beaver hat, made by the Serratelli Hat Co. and it was in great
shape. It retails new for $240.00, so you could say I got a great deal on it.
I tore it apart and rebuilt it the way I wanted it to be.

This is the hat I used as my inspiration for this one...
My very nice $34.00 hat as it came in the mail.

I removed the sweatband, liner and hat band so that I could have a "blank canvas."

The hat body is now stretched onto a hat block in my head size and I used a small rope
with a hatter's knot in it to form the brim break.

The hat is now blocked and the brim flattened (ironed out).
It's so nice to work with good quality felt!

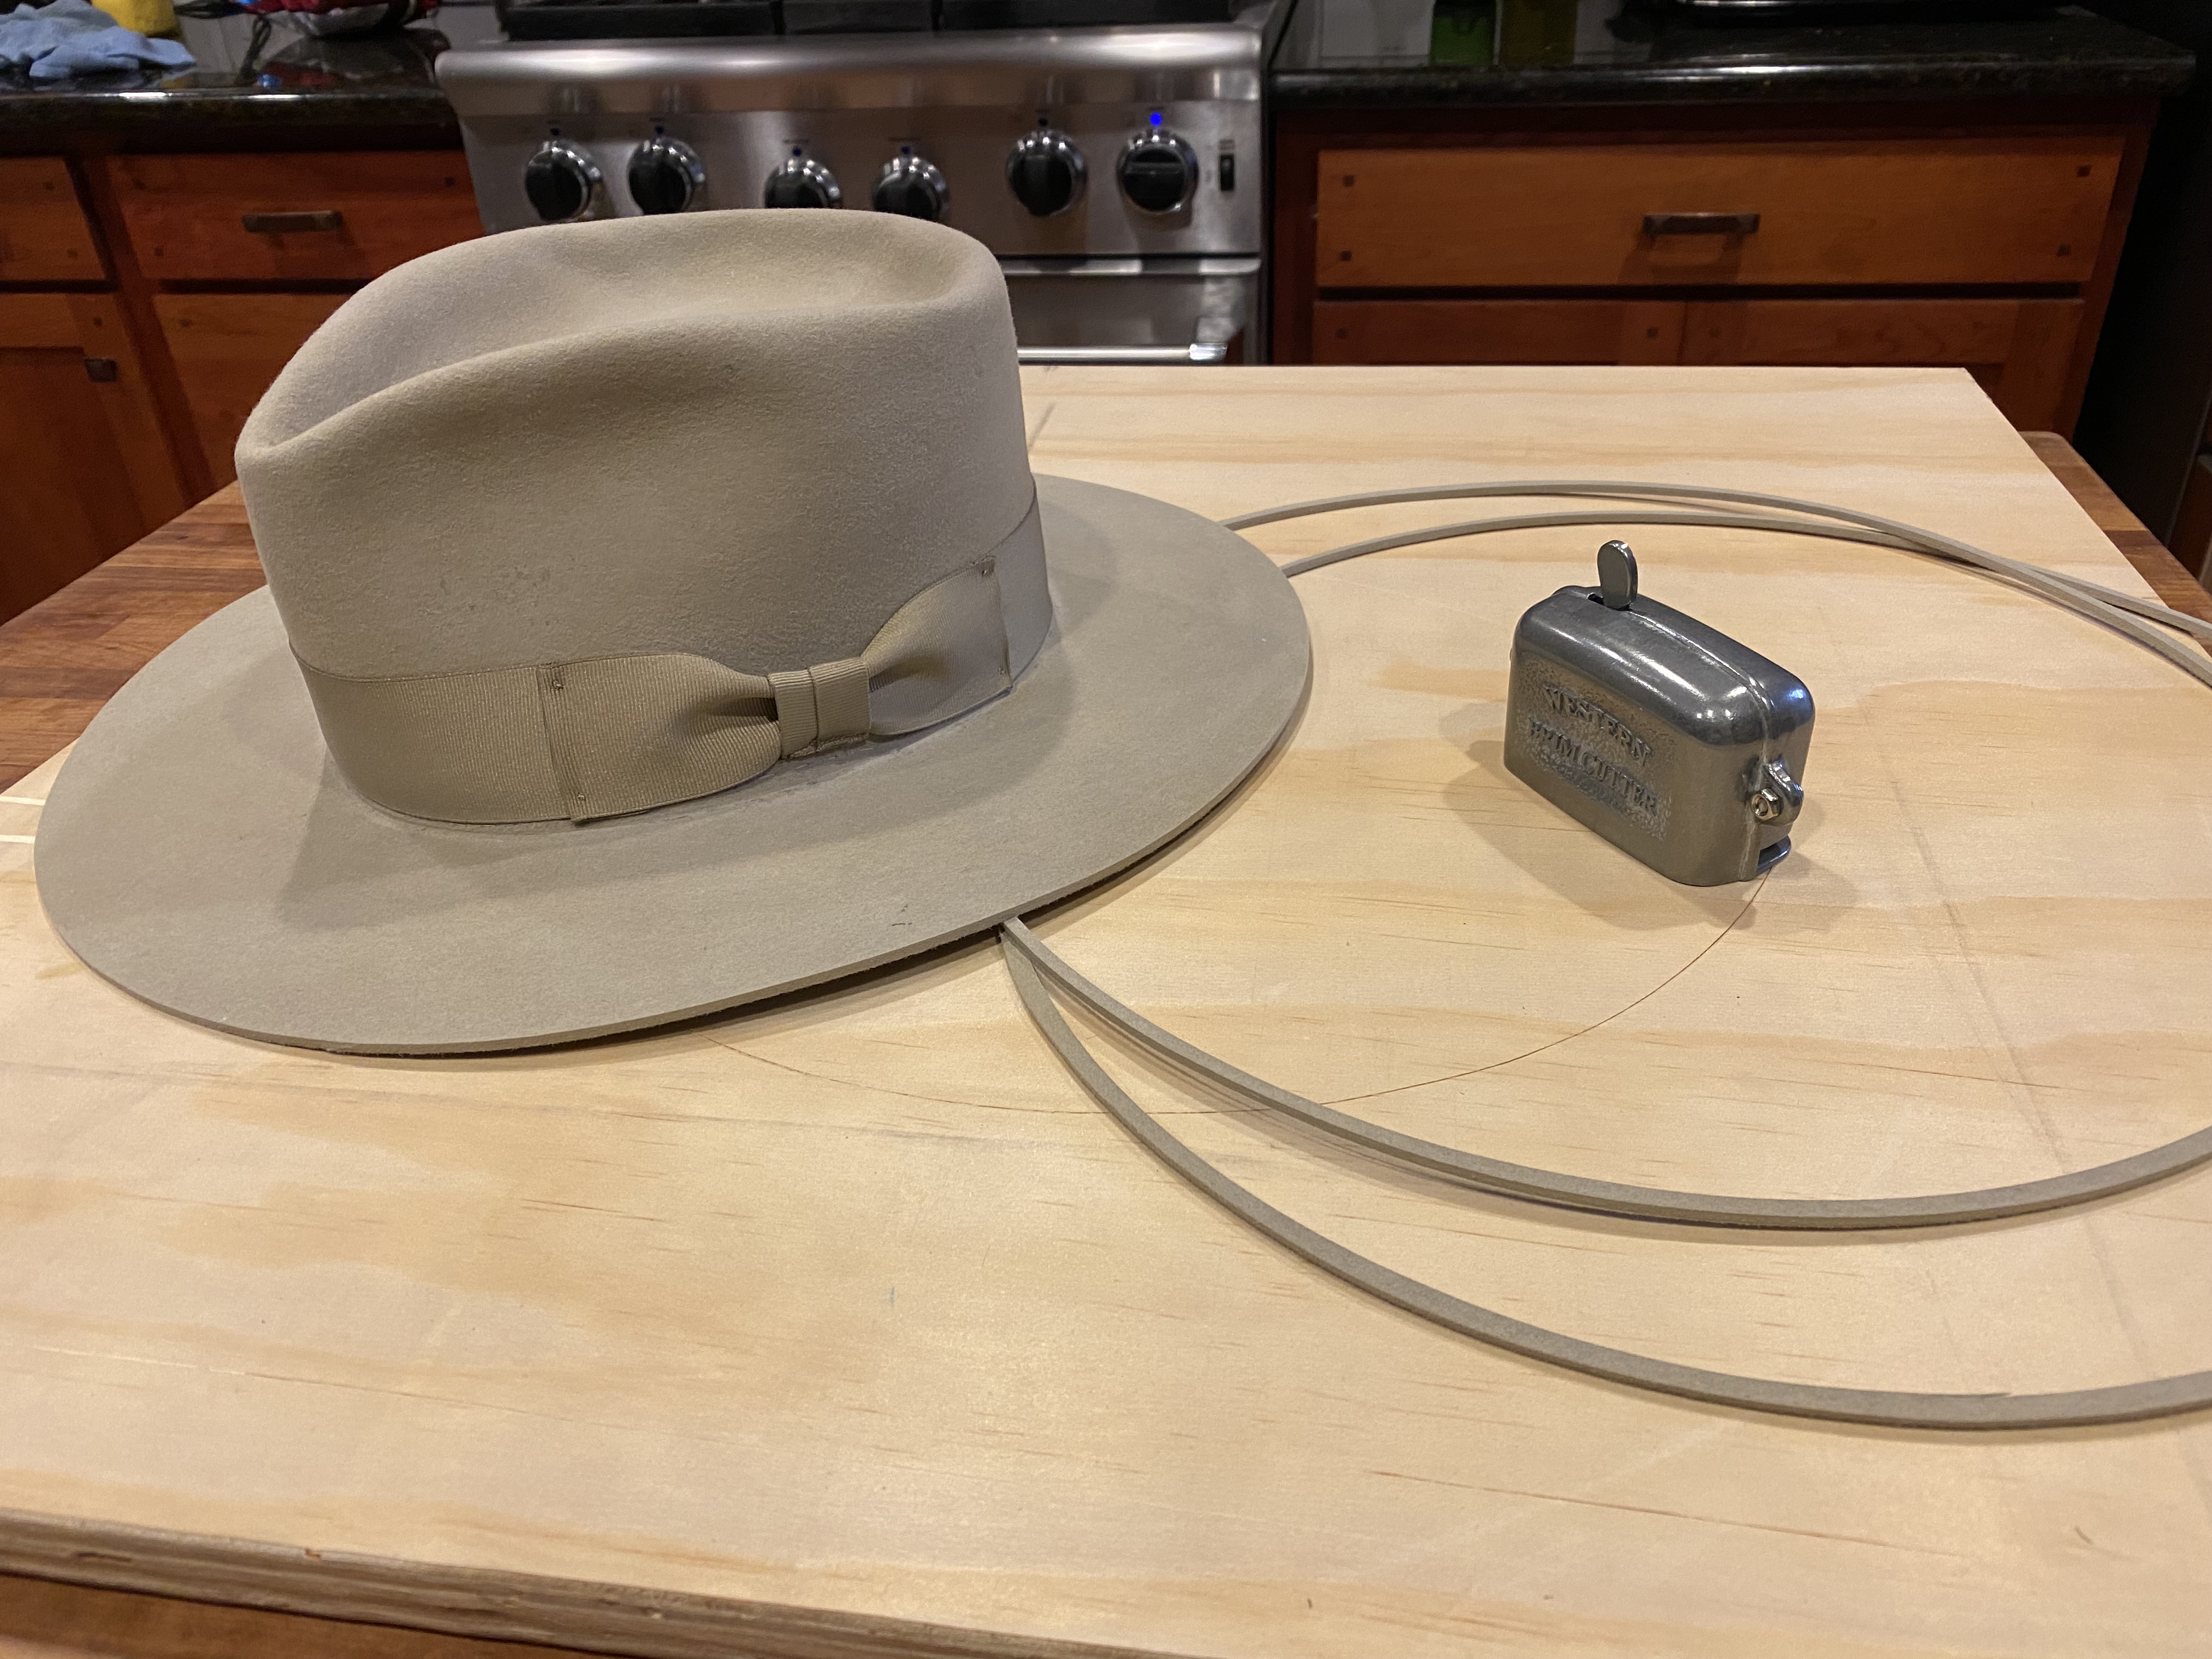
Using my new (hand made) rounding jack, I trimmed the brim to size.

I sewed in the sweatband and put the first crease in the hat so that I could align the hatband properly.

The hatband is on and it turned out great.

Now for the fun and unpredictable part...the patina. There's not a lot of info. out there on how to properly patina a hat. Most hatters keep their methods a secret, but from what I could find, light oils, salt water, clays and dirt are often used to give your hat that worn look.
I can't stand the look of hats that are over-patinaed. I believe that if you're going to age your hat, you should just give it a head start and then you can earn the rest.
Just prior to doing this hat, I lost my beloved Yellow Lab "Dexter" to cancer and I wanted to somehow honor him with this hat. So, to patina this one, I applied small amounts of a light oil here and there and then I dusted the hat with some of Dexter's cremains. I love the way it came out and now, I'll have my dog with me whenever I wear this hat.
A HAT TO REPLACE ONE I SOLD
In early 2022, I had a little party at my place for some close friends and neighbors and my neighbor really liked my hats. He offered me an insane amount of money ($2,500.00) for three of my hats (my favorite felt and two of my straws) and I couldn't turn the opportunity down.
Now, I have to replace my favorite felt hat and I found a used cowboy hat on E-Bay that I tore down to its base and remade it into the style I like.
This was the hat as it arrived from E-Bay


Blocking to my hat size.

Brim Trimming

Putting on the hat band & bow.

Fine tuning the brim width a little at a time.

Voila!
MY FIRST OPEN ROAD-STYLE HAT
I've always like the simplicity and timeless design of Stetson's Open Road
hat, with its Cattleman's crease and short brim that can be worn snapped up or down.
So, as usual, I started scouring the local thrift shops, antique stores, etc. to find
a hat body that I could shape into my own Open Road.
Thank you for sharing this amazing post. Looking forward to reading more.
ReplyDeleteCustom Printed Hats Wholesale
Thanks for this. I really like what you've posted here and wish you the best of luck with this blog and thanks for sharing. Hat Embroidery Miami
ReplyDeleteThanks for sharing this type of informative post. Keep sharing your post. Custom beanies are more popular day by day.
ReplyDeleteAlso, check this link
Custom Beanies
There's nothing like a custom cowgirl hat to top off your western look. Whether you're headed to the rodeo or just out for a night on the town, a custom cowboy hat says you're a true original.
ReplyDeleteHey there, Aimless Roamer! Just finished reading your blog post on custom hats, and wow, you've truly captured the essence of personalizing headwear. Your knack for detailing the significance behind each design choice is impressive. The way you highlight the blend of style and identity in custom headwear is both engaging and informative.
ReplyDeleteI particularly loved the way you showcased various hat designs and how each one tells a unique story. If you're looking for further customizable options, I highly suggest exploring Kit Promo Australia. They provide various customization choices such as logos or other personalized designs. My experience with their website while customizing my hat was fantastic.
Cool
ReplyDeleteStylish
ReplyDelete