My Flatbed Camper Build

I've wanted to build a flatbed camper for quite a while now, but
I was putting it off until I retired. Well, I retired in June, 2022 and
the following day, I went to work.
Bear in mind, I started researching everything over a year in advance and I started ordering the aluminum, the flatbed tray and all the components 6-8 months
in advance and I'm glad I did, because some things had significant delays, especially the aluminum and truck tray.
I know that the method I used to build this camper (aluminum
tube framing) creates a lot of thermal bridging, but my existing
camper is built in a similar way and it's never been a problem. This is a
method I felt was well within my skill set, whereas, laminating my own panels
and attaching them to angle aluminum, would have been totally new to me.
Here are the stats:
2004 Dodge Ram 2500 5.9L Cummins Diesel
Truck and Tray Weight: 7,120 lbs.
Camper Weight (fully loaded): 2,520 lbs.
Total Rig's Wet Weight: 9,640 lbs.
11.85 Average MPG (fully loaded)
Build Cost to Date: $35,760.00* (camper only)
*Although I kept a very detailed ledger of my expenses, further explanations are
needed, so here they are:
a.) The $35,760.00 is for the camper build as well as the aluminum truck tray;
b.) Cost also includes an all aluminum winch bumper and 12,000 lb. winch;
c.) Some specialized tools I needed to buy are included in the cost estimate;
d.) In many cases, I ordered extra quantities (raw aluminum, wire, paneling,
fasteners, sealants, adhesives, etc.) so that I was sure I would have
enough. My cost estimate above includes these "over orders" that I
made, so the actual cost is somewhat less than the figure above.
e.) I also included the cost of some other items that aren't camper specific
i.e. Kuat dual ebike carrier rack, travel expenses to pick up the truck
tray in Idaho, battery tender and Ride Rite air bags to bolster the
truck's suspension.
Here are my build photos .

This is my rig on its maiden voyage. I took it on an 8 day trip to Tecopa, CA, Death Valley
National Park and Goldfield, NV. I put 960 miles on the odometer and the whole rig
performed flawlessly.

This dual-zone fridge is a game changer. You can set it so that both sides are fridges or
both sides are freezers or one zone each. It's so nice to have ice in my cocktails in the evenings.

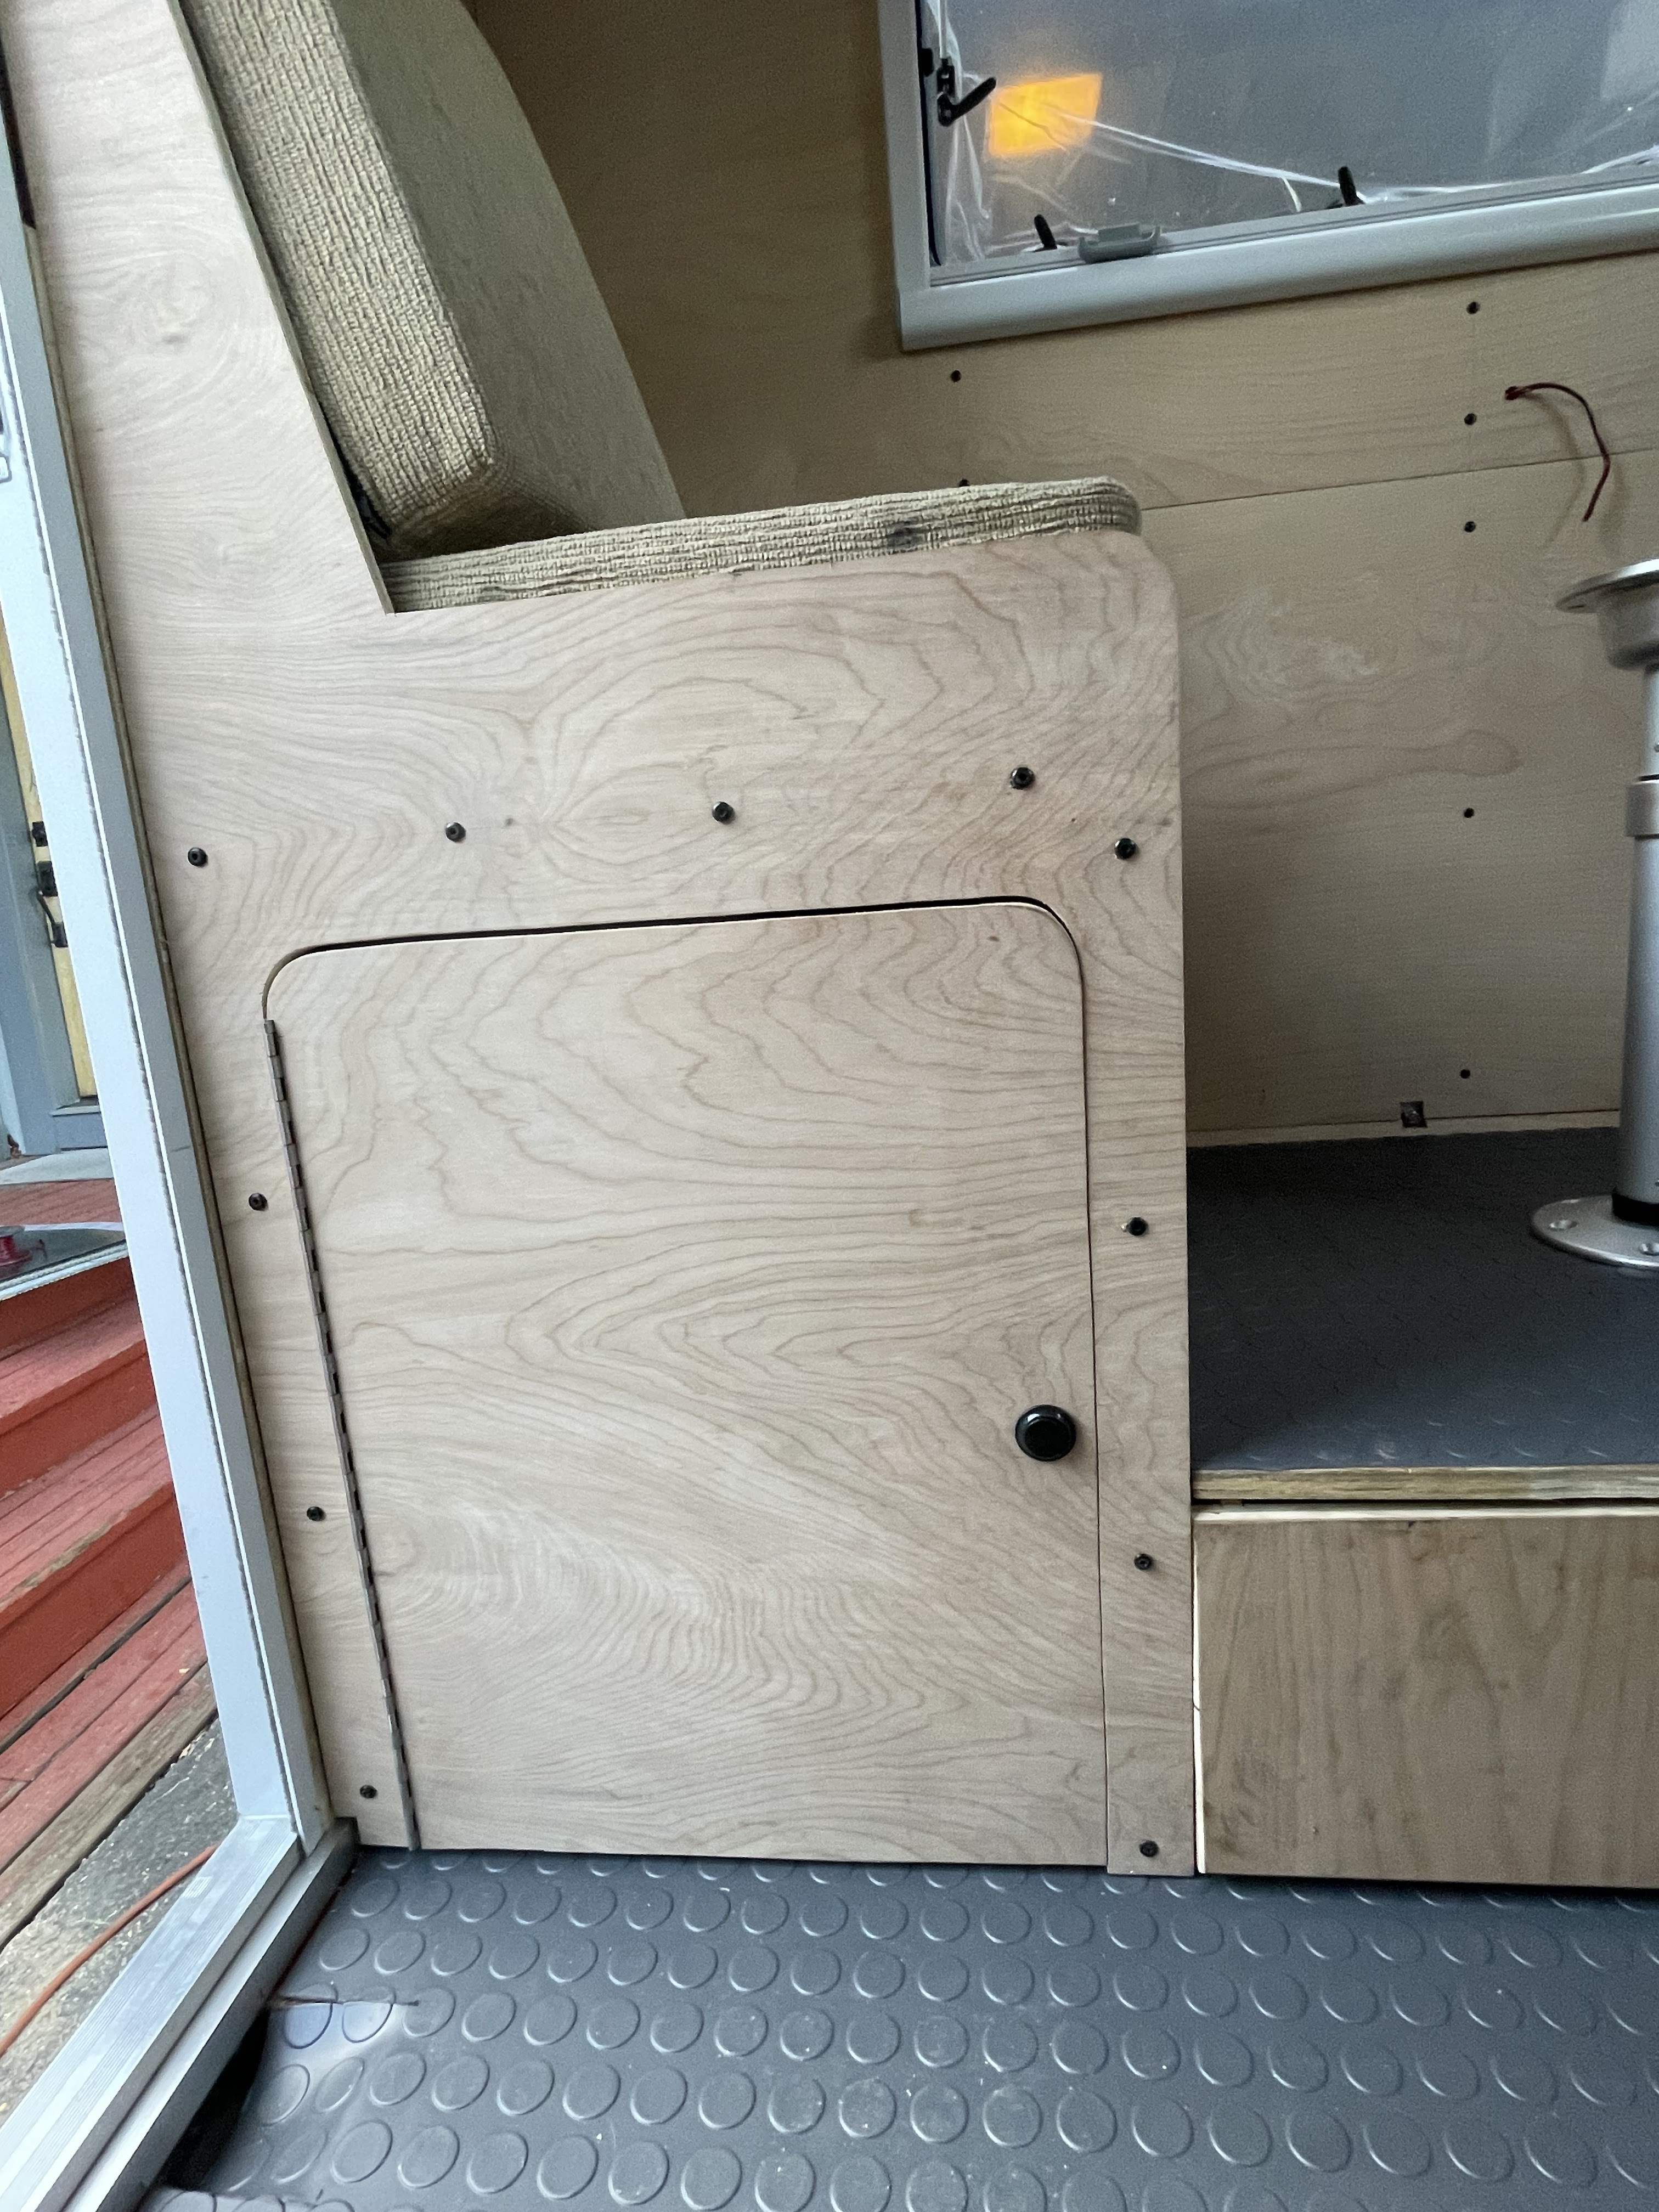
This little side cabinet has a little safe mounted on the top shelf and can
also house some larger items in the lower portion.

Under the seat Porta Potty storage as well as a deep drawer under the table platform.

Under the right dinette seat is storage and a propane line for my Wave 6 catalytic heater.
I also have USB, USB-C and 12 volt plugs above the dining table.

Several people have asked me what the wire thing is that's mounted to the ceiling.
It's a hat holder.

My daughter made me the Bigfoot prayer flags hanging above the window.

Here's a view from the entry door. My mattress is in as well as some cabinet doors.
You can also see the dinette cushions, which I also made thanks to some YouTube videos.
The dinette is finished with Formica's "Boomerang" pattern for that vintage look.
The dinette also breaks down to become an additional bed.

Here's a view from the bed. I put a coat of linseed oil on all of the wood surfaces and I
have the wood facades mounted on my milk crate drawers.
I also started adding some decorations like the prayer flags and decal boards.

I carpeted and trimmed the electrical cabinet and also mounted a CO
and LP gas detector as well as additional vents and 110v outlets.

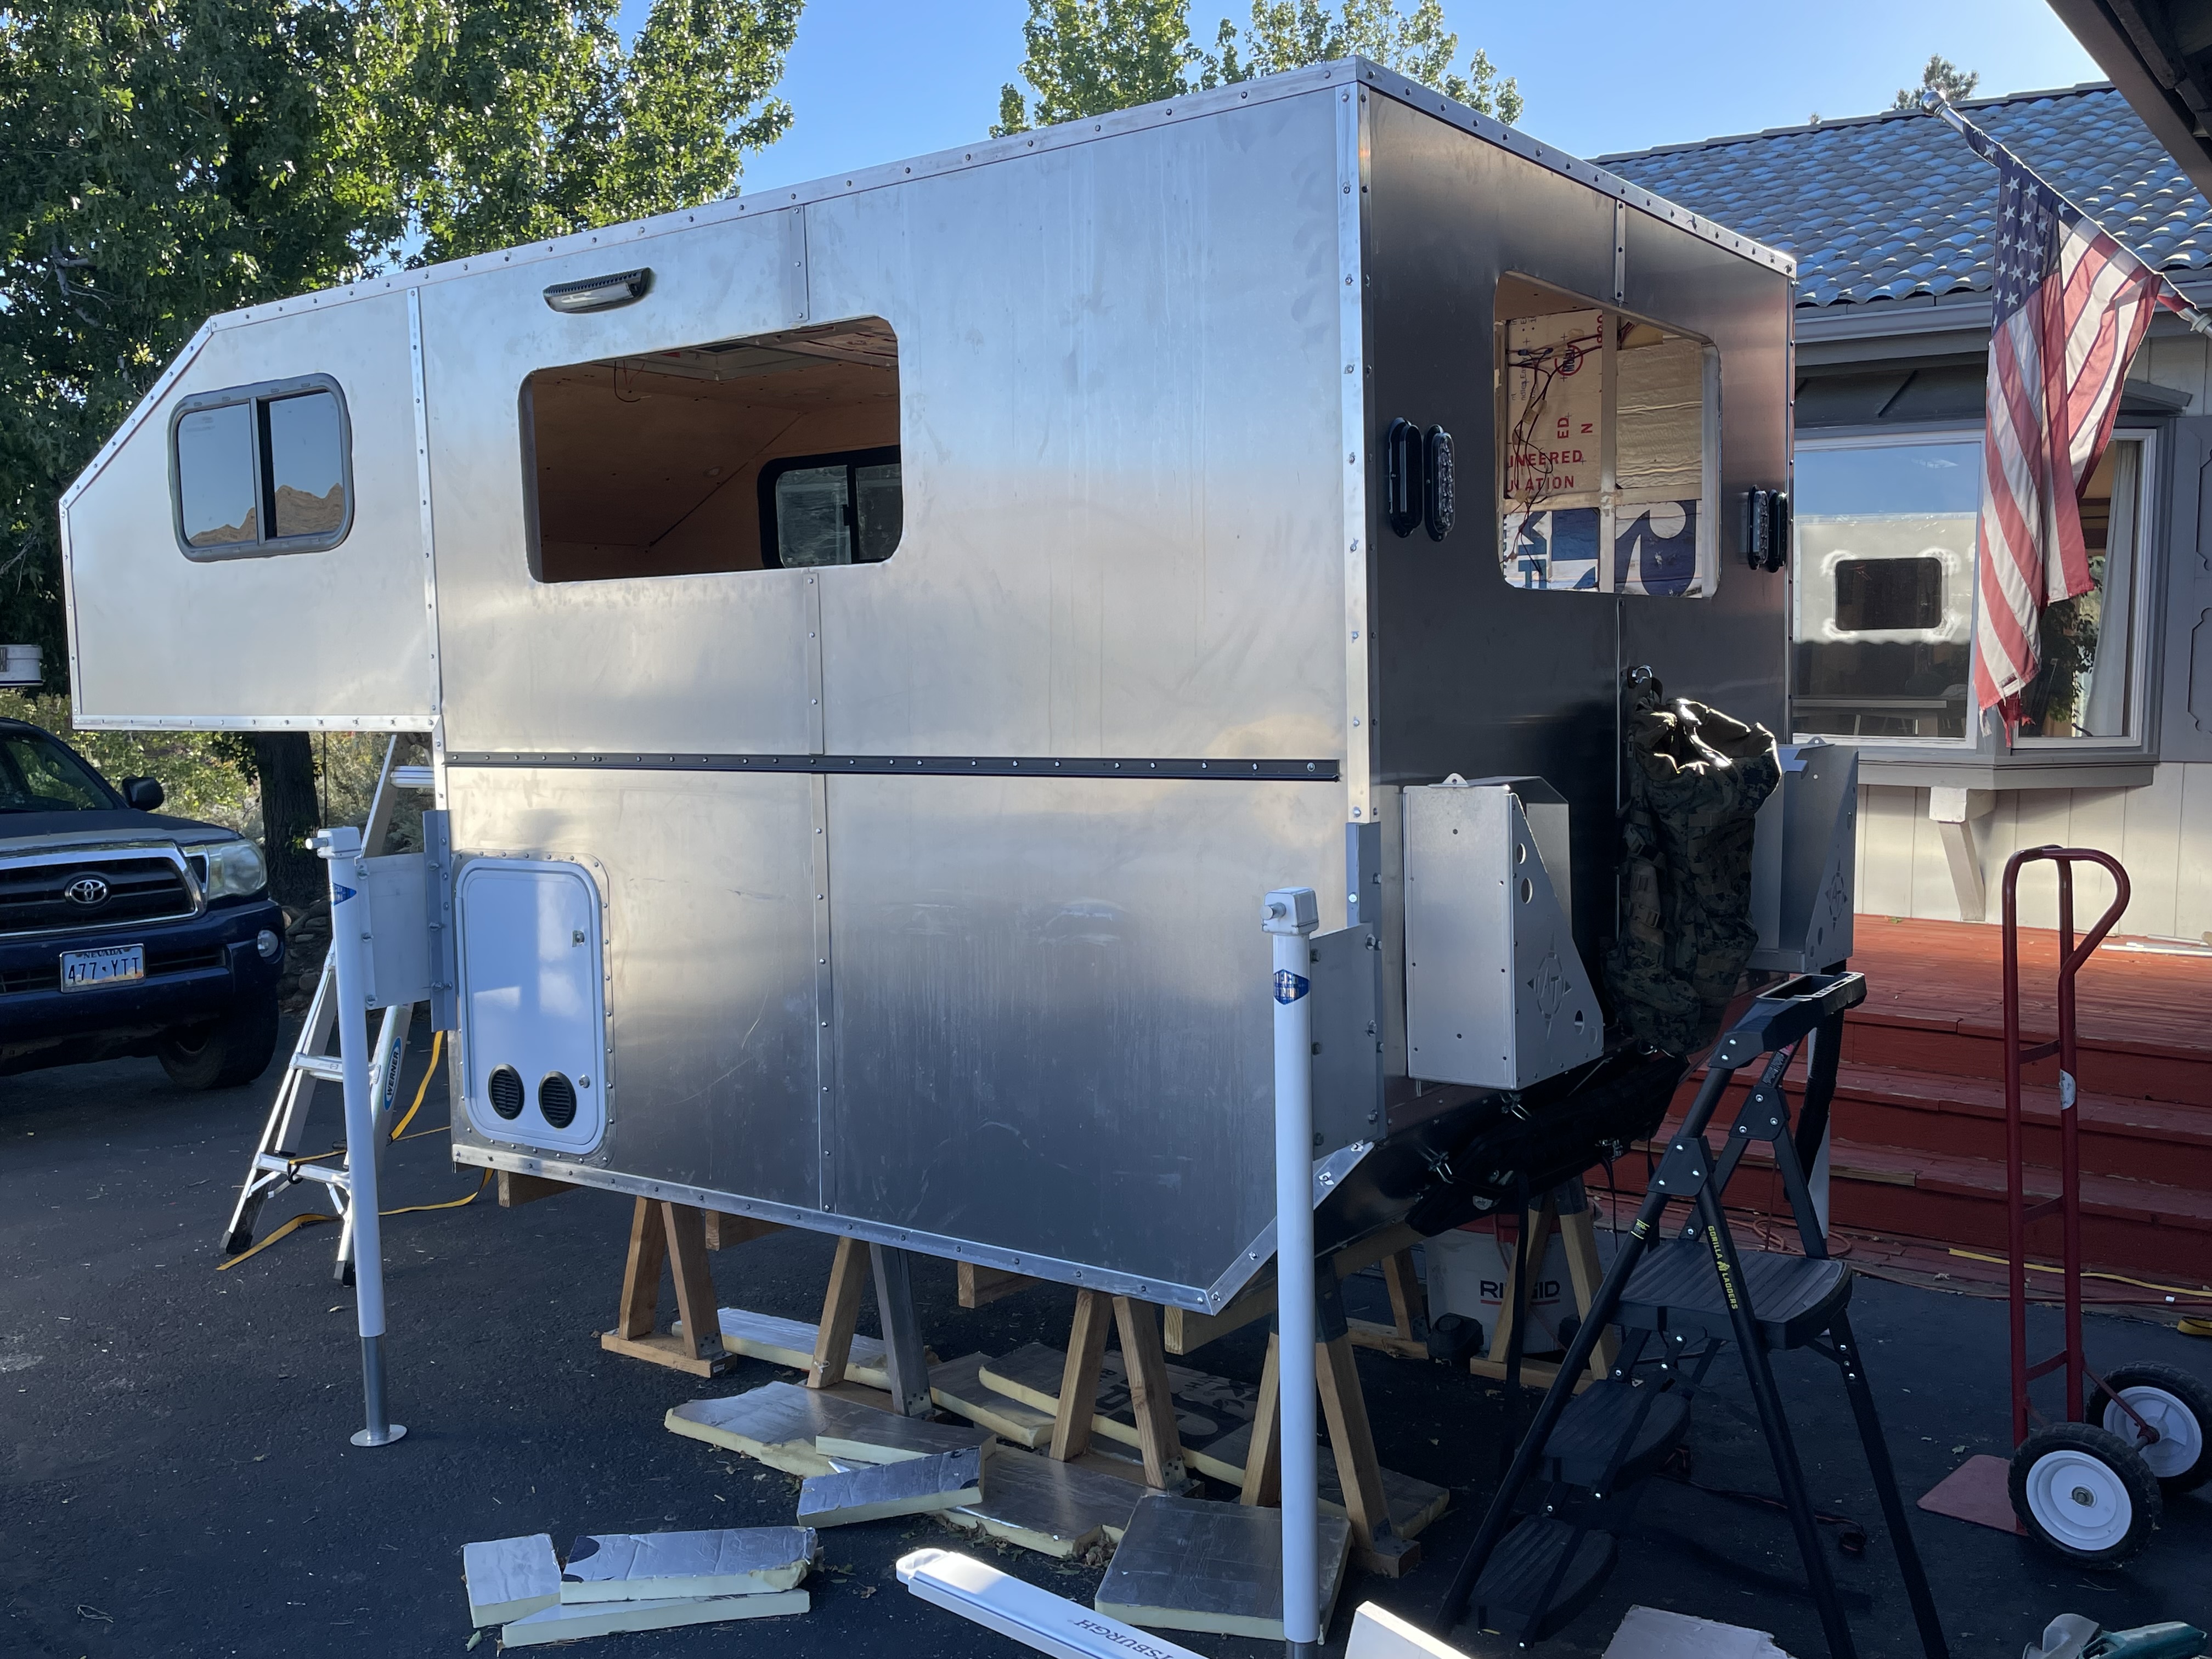
Here's the exterior propane cabinet. It's large enough for the propane bottle
oils & fluids, air compressor, tools, fire extinguisher and my smelly old
favorite kerosene lantern.

There will be a real queen-sized mattress in the sleeping area, which is a big upgrade for me
from the straight foam mats I've always used in the past.


I'm very happy with the way this turned out.

I chose to use milk crates as drawers because they're straight-sided and can
be easily removed for cleaning, loading and unloading. I'll get matching crates
and wood facades to make them look better.

I got the flush-mounted extra deep sink and stovetop installed, as well as a large,
deep drawer on a full extension slide.

Now to start building the galley's cabinetry.
The large aluminum box is the propane cabinet that's access is isolated to the outside
only. This is for safety reasons.

My rooftop solar panel array.
A note on the solar: I had all of the solar and it's components purchased
through, and installed by Zero Declination in Reno, NV. This was not cheap by
any means, but their team really knew what they were doing and they use only
top of the line components. I feel confident that this system will serve me well and
be more than ample for my needs in the years to come.

A closer look at the wiring by Zero Declination in Reno, NV.

Inside are two 100 amp hour Battle Born lithium batteries, Victron solar controller, Victron
DC to DC charger and a 2,000 watt Renogy inverter, along with all of the connections,
shunts, fuses, etc.

I built this cabinet to house all of my electrical/solar components and it'll be where my fridge sits.

I put some exterior turnbuckles on the corners for some added peace of mind.

All of the interior mounting bolts lined up magically.

I needed some extra blocks under the jacks, but it worked.

Hey, it's going to fit!

It's time for the harrowing feat of loading this bad boy onto my flatbed tray.
This was a lot more unsettling than it looks...


much as I did when I built this drawer. In fact, I built the first drawer, glued it and reinforced it
only to find out that my measurements were WAY off (I mean not even close). Anyway, I
measured very carefully a second time and built it again. Even with the correct measurements,
it was still a bitch to get it correctly mounted on the drawer slides (the beer that's pictured
definitely helped me keep my sanity).
Oh well, it's in now and it'll provide a ton of storage.

I'll also have room in this cabinet to store a few other things.

I plan to put the bed panel on some heavy duty struts.


reinforced walls.


Here, I've also reinforced the rear wall to which I'll mount my dinette and seating.
You can also see my huge Arctic Tern rear window, which will give
me a great view while sitting at the table.

which will sit on a cabinet that'll house all my electrical components.

I also got a lot more paneling done and made some switch panels for the electrical.


of propane, but other "smellables" like kerosene, diesel,
motor oils and fluids, etc. It's completely sealed off from the
camper's interior.


as multiple USB and 12 volt cigarette lighter plugs throughout.


maintain my solar panels, etc.

awning material for a lightweight shade option.


radiuses and then use the dreaded Bondo to smooth it all. I had a funny feeling that
I'd have to use Bondo at some point because I knew there would be mistakes. Luckily,
these mistakes were minor...time consuming, but minor.

more security than many other brands.


building it.

The aluminum extensions on the jacks were necessary so that I'd have
enough room to back my truck under the camper when it's raised up.


on the odd angles i.e. the departure angle and the slope on the cabover. It worked
great, although I would have loved to have had an 80 inch break...

I should be noted that, on the recommendation of a professional camper builder,
I used mostly Olympic Tri-Fold rivets and they weren't cheap. At $1.58 each I definitely
felt it in the wallet. Plus, the rivet shaving tool was almost $400.00!

the polyurethane, but I guess it was dry enough, because I had no issues with warping
afterwards.


under the hot August sun is NO FUN!


I'll have a two person "booth-type" dinette under that big window.


but it also turned out to be the best seam that I got on the entire project...
Go figure...


I'm going to love this big window. For the main portion of the camper, I bought really nice
windows, made by Arctic Tern. Since windows are the way in which you interact with the
outside world while you're in the camper, I splurged on them and I have no regrets.


completely honest, I didn't need a departure angle, but I love the way they look on campers.


to prevent any gas/fumes from entering the camper.

most of them required numerous trips to the saw. My knees paid the price for all of the up and
down and in and out of the camper during this part of the build.


what have I gotten myself into." I've said that a lot throughout this build, as it's a much
bigger challenge than I ever thought it would be.
Although I have absolutely no regrets on taking on this project, I can also say that I'll never
do this again.

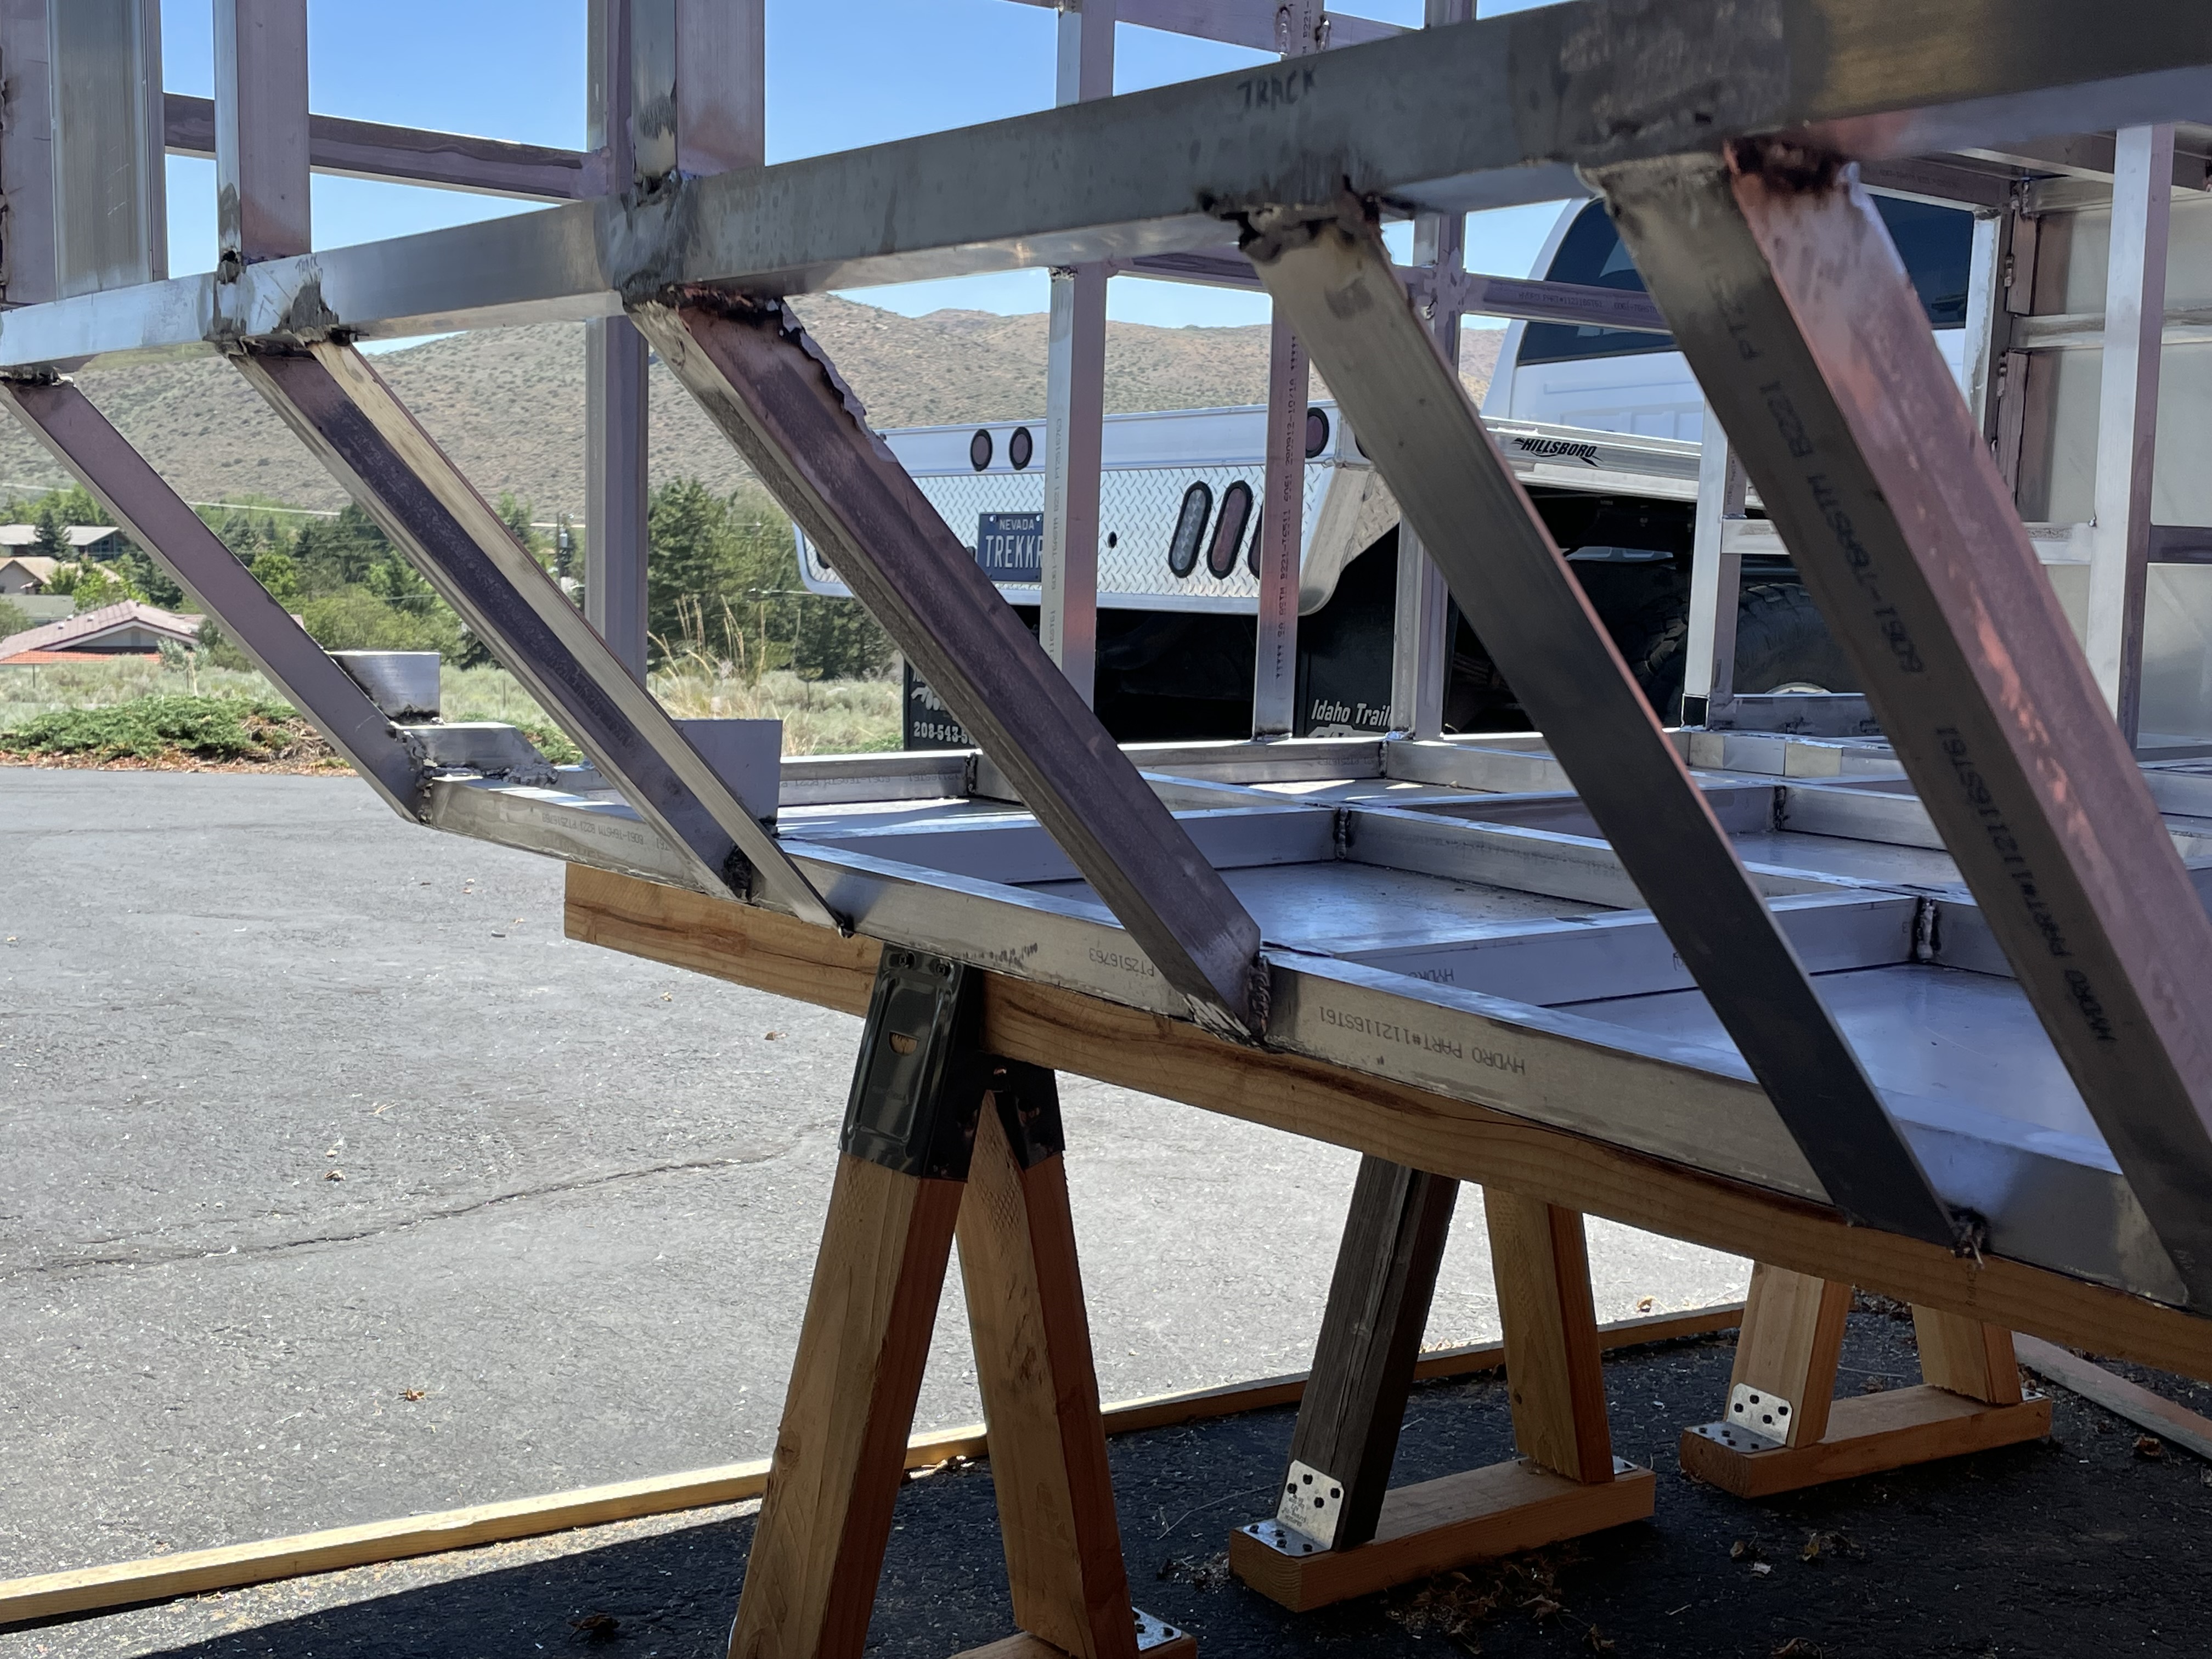
This is a Hillsboro tray and I bought it from Idaho Trailer sales in Buhl, Idaho. I can't
say enough good things about Idaho Trailer sales. My bed came in when they said it would
(still a 6+ month wait), they had it completely installed in four hours and even though the
price had gone up since I had placed my order, they honored their original quote.
Yes, I drove 8 hours each way to get this bed, but it was still cheaper than my local dealer
quoted me for the exact same bed.
Shane, very nice. I wish I had those skills!
ReplyDeleteShane, the camper is looking great, nice work, Sir!
ReplyDeleteYou are making great progress and it is looking good!
ReplyDeleteAwesome build! I know this is a very old post, but where did you get your aluminum sheet metal? I am having trouble sourcing some for a similar build and everything online is really far away or insane shipping.
ReplyDeleteHey Daniel, I got all of my aluminum (tubing, angle, flats and sheets from Coast Aluminum. I had some of the same issues you're having, but luckily I found that Coast had a delivery depot in Reno. I ordered it all and then had to go pick it up.
ReplyDeleteThis is really cool. I've screen shot a pic of your build and have it listed second on my "vision board." I'm hoping to somehow, have a similar set up. I'm in Southeast Asia... buying a second hand build is probably the best bet.
ReplyDelete